Blog

Learning Management System

Viewing posts from the Learning Management System category

How to bulk upload on Adobe Captivate Prime without using the built-in feature

We have a large client that is using Adobe Captivate Prime. The client requested that we add users in bulk. We first recommended the self-registration approach wherein users self-register. However, they preferred the bulk registration internal learner route.

Here where things get a little bit challenging.

Currently, Adobe Captivate Prime is an LMS System which once you get the hang of it works intelligently but, what happens when things don’t work as expected?

The bulk upload feature via CSV is a pretty standard way of populating data. Basically, we have to have a basic CSV file with a basic data set “Name“, “Email“, “Profile” and “Manager“.

Seems pretty basic right?

Well, I followed Adobe Prime’s instructions to the letter and it didn’t work.

https://helpx.adobe.com/ca/captivate-prime/administrators/add-users-in-bulk.html

I tried many variations in terms of structure and logic. I even downloaded their sample CSV file to see if I could get it to work. Still no luck but was learning more after reading their forums.

https://forums.adobe.com/community/captivate_prime

What, I gleaned off of their forum was that the feature is broken. I assume at one point is was working correctly but, it is fundamentally flawed. The one thing I noticed that it was easy to upload the file but, every time there was an error in the processing. Usually, when you upload a CSV file it will typically update any of the fields that have changed e.g. first name is John not Johnny. However, in Adobe Prime you will get an error. Even with a unique dataset for the CSV there is typically an error with little description to what the problem is e.g. an internal error has occurred.

One thing that I noticed when I tried to manually add a single user via the website it worked without any issue.

Here is some background about myself. I started off in the software consulting world was a web designer but, gradually I learned how to code in a variety of languages and platforms. One experience, that I thought be helpful was during software testing.

Typically, when testing software or websites it becomes very repetitive. That’s when software testing tools come to play. What I used previously was selenium.

https://www.seleniumhq.org/

What selenium does, it allows the end-user to record their actions on the screen. It converts them to scripts which you can automate and program. I’m a Mac user and found that using VMWare wasn’t ideal. I was getting limited success but, thought I was on the right track.

The solution was to record the steps correctly, create a loop and automate it. I found a better tool with lots of documentation.

Katalon Studio is a cross platform solution to run automation tests.

https://www.katalon.com/

The first step is to record the screen accurately. At first, I recorded all the actions e.g. go to URL login, etc. What I really wanted was just to “Add a Single User” and repeat it based off of sample data in a CSV file.

The difficult part was selecting the right elements to record. In Adobe Prime all the fields are very dynamic with unique IDs based off of the user session ID (which means when you shut the browser window and re-open it won’t work). After experimenting with capturing CSS ids and Divs (neither worked well). What seemed to work the best is xpath values.

An example is something like this (don’t worry the tool generates this for you)

Below is the name input field for “Add a Single User“.

xpath=(.//*[normalize-space(text()) and normalize-space(.)=’Name’])[2]/following::input[1]

With the tool I was able to capture the flow but, it seemed a little complex. I discovered a sister product which was able to do it perfectly Kantalon Recorder Plug-in for Chrome. I was able to reproduce a dynamic record that would show up as an internal user with a click of a button.

How to automate this?

One record wasn’t really going to help me. What about 10? Or 1000? Well, with this tool I was able to automate it with a CSV file.

The trick was to figure out how to attach a CSV file automate the output and loop through the records.

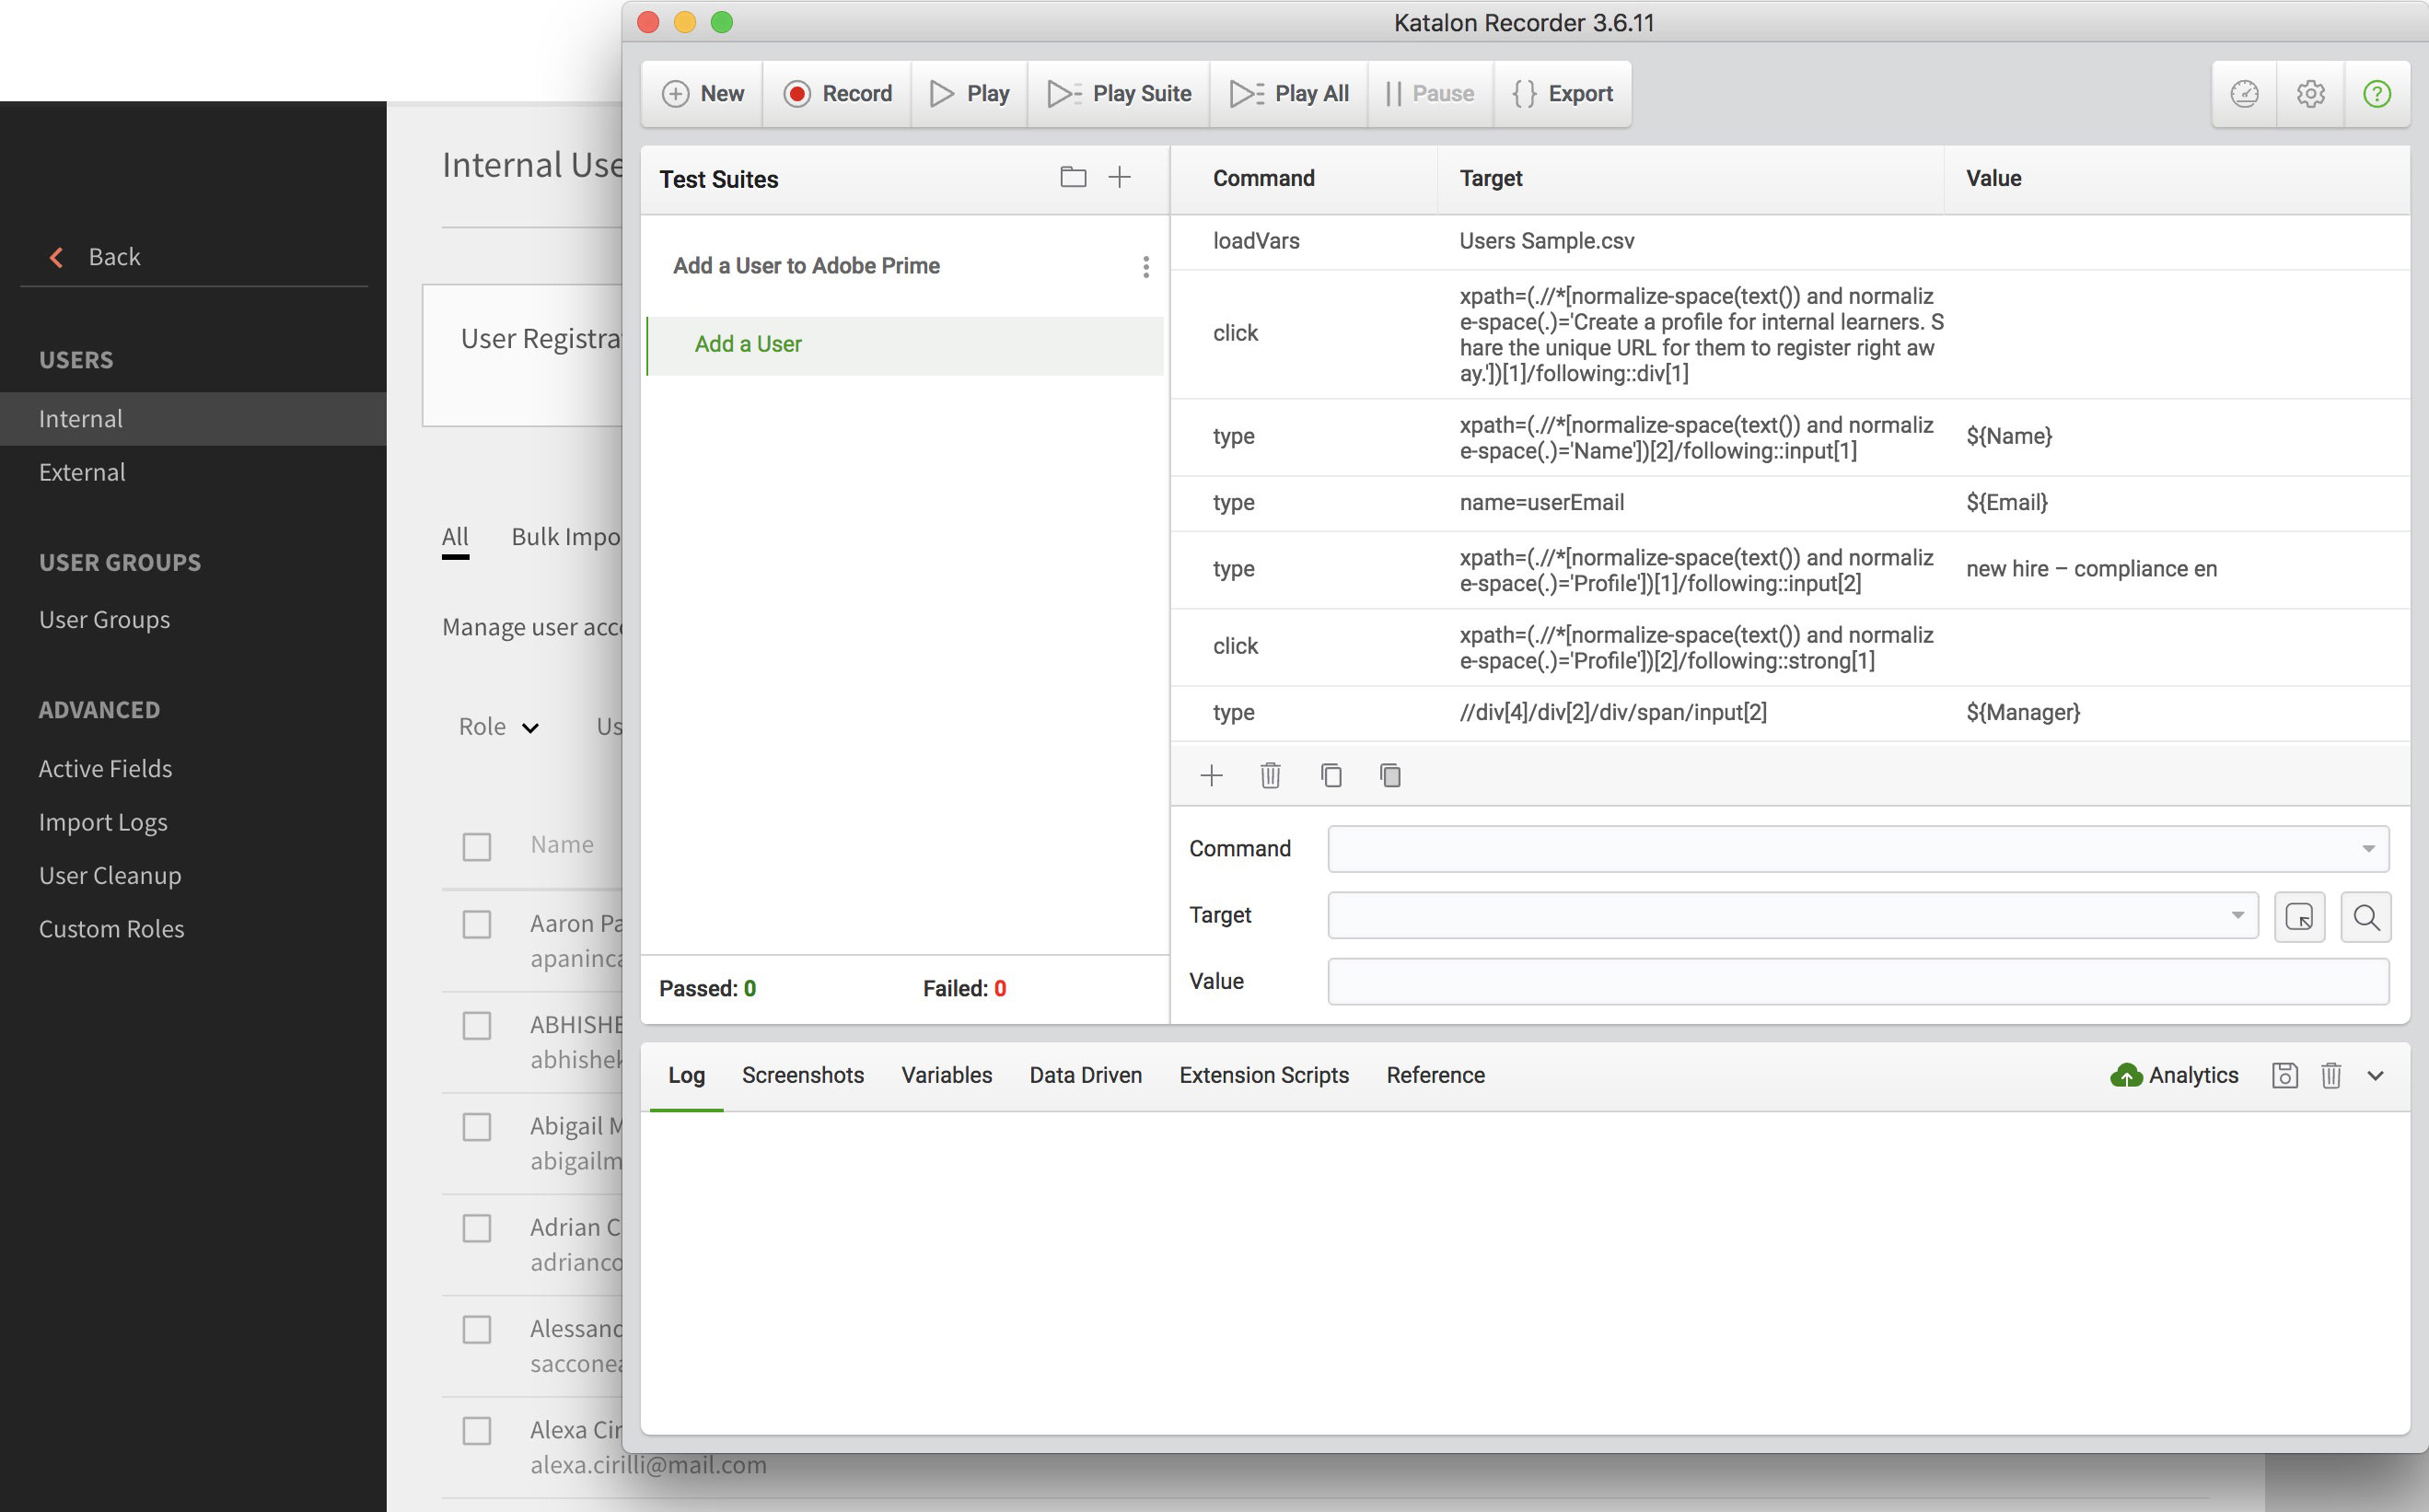
In the tool there is a tab called “Data Driven“, click “Add CSV File“. The attached file has been added to the tool. I then had to change the hard coded values to dynamic values e.g. John Smith becomes ${Name} (this is the same name as your column header in your CSV file). All I had to was match the header names to the hardcoded values e.g. ${Name}, ${Email}, ${Profile} and ${Manager}.

The one thing I had to do to make the file all work was to add one command at the start.

LoadVars

Target: The Path to your CSV file. I put it at the root of the saved project to make it easy e.g. “My_Data.csv”

At the end add a new command

endLoadVars

That’s it, best off this plug-in is free and cross platform.

Step 1
Install the Katalon Recorder Plug in
https://chrome.google.com/webstore/detail/katalon-recorder-selenium/ljdobmomdgdljniojadhoplhkpialdid

Step 2
Log-in to Adobe Prime as an Administrator

Step 3
Click on the Side Nav bar to Users

Step 4
Launch the Chrome Extension Kantalon Recorder

Step 5
Open the file in Katalon Recorder
Add a User to Adobe Prime.html
(Please note: this file reads “Users Sample.csv” (which contains a list of all users to be added)).

Step 6
Ensure the speed is set to medium-fast. Click the play all button. This will add all the users from the CSV file to Adobe Prime.
(Please note: this is a one-time use, new users must be added in a new file)

Download the CSV Upload Engine for Adobe Captivate Prime

Good luck! I hope my solution will work for you.

Using and Setting up Adobe Prime from our Perspective

Here is some background about myself. I come from working in the software and marketing industries being a developer, programmer and a UI UX Designer for a wide variety of platforms. I’m very comfortable troubleshooting Storyline with custom javascript and variables to make it SCORM or Tin Can compliant.

I’d recommend this product for medium to large organizations that require: solid functionality, decent reporting and a mobile friendly experience.

I was given the task of working with a client who had difficulty integrating Adobe Prime as a Learning Management System in their organization. Some of the issues were related to migrating from Adobe Connect (a repository for content that can be consumed for other LMS systems) and others were related to lack of documentation from Adobe Prime.

Here were some of the constraints with the project :

  • The majority of content was designed for Adobe Connect
  • Starting with a large library of content in a variety of formats that were mostly produced by Adobe Captivate
  • Multiple standards from a variety of different vendors
  • Starting with a large number of zipped folders that were made in a variety of formats e.g. zipped versions of Adobe Connect and SCORM 1.2 files
  • Multi-language setup
  • Previous administrator had uploaded Adobe Connect files to Prime
  • Adobe Prime has little documentation, no stackoverflow, no user forums outside of the Adobe community

Where to begin?

Prepping for Adobe Prime

First we had to do a full audit of the zipped files and source files and apply some standards e.g. all files are Captivate 10 (with standardized settings, naming conventions and outputted files in Standard SCORM 1.2 format). This required opening up the source files, making all the requested changes, saving them in the various formats, and lots of testing.

How Adobe Prime Works

The application is divided into four primary roles: Administrator, Integration Administrator, Author and Learner. Users can toggle back and forth between roles they have been assigned appropriate permission. In each of the four areas, video tutorials guide the way.

Learning Options
The learning options that we used to build a program from scratch were as follows:
1) Make sure you are logged in as an Author.
2) Add content. Go to the content Library and add your content (you’ll be able to upload a a variety of different file formats.

For Interactive Content
The supported format is .zip.

  • Scorm 1.2
  • Scorm 2004
  • AICC
  • TinCan

For Static Content

  • Videos: mp4, .avi, .wmv, .mov, .mpg, .m4v, .3gp
  • Pdf
  • PowerPoint – .pptx, .ppt
  • Word files – .docx, .doc
  • Excel files – .xslx, .xls

Step 1. Create courses. Combine any modules you have uploaded to create a course. This was straight forward to use you can drag and drop and rearrange with no difficulty.

Step 2. Create learning programs. Combine any courses that you want in an ordered or unordered fashion.

Step 3. Add users. They can be internal and external. We found that for testing purposes it was better to do this via an incognito window. Our client wanted an external user and attach learners to that user.

Types of Users
New users can be added in a number of ways. You can enter users individually, import them in bulk, and or allow users to self-register. There are two main groups of users: internal and external.

  • Internal users – You can add internal learners a few different ways. You’ll probably want to use the Bulk Import option. This allows you to use a standard CSV (comma-separated values or delimited) file that you generate from your organization’s human resources system. This is fast and easy. Besides expected fields such as names and email addresses, you can also import fields specific to your organization to include in the reports that Prime will generate. You can even have Prime automatically create groups for you from information in the CSV file, such as job categories, departments, and other factors. You can also set up other groups and even tenant-sharing.
  • External users – External learners are those who are not part of your organization. From within Prime, you create a group name for an external organization or category and generate a link and QR code to send to its external users. You can brand the group as well, a nice way of differentiating each group. The users who follow the link then create their own login name and password.

Step 4. Create learning plans.  Adobe Prime lets you set up events that are based on one of these occurrences:

  • A new user is added
  • A user is added to a group
  • A user completes a learning object
  • A user achieves a skill level
  • A date is added

Yeah you’re done…

Some Extra Notes

Reporting
Choose from sample reports or create your own. I found these to be really hassle-free. Prime tracks everything thrown at it—completion data, time spent, etc.—and then allows you to create reports from any and all data collected. You can create your own custom reports or base them on the following:

  • Enrolled and completed courses
  • Course effectiveness
  • Enrolled and completed learning programs
  • Learning time spent per course
  • Learning time spent per quarter
  • Assigned and achieved skills

Set up your X and Y axes and the time span, and you’re ready to go.

Some Important Prime Features

  • Mobile access – Learners can download the free Captivate Prime app to take courses on their mobile devices. I’d recommend the Mobile App it seems a little bit more polished.
  • Fluidic Player – When students launch courses, Prime’s Fluidic Player lets them very nicely experience all kinds of content, such as PDFs, videos, PowerPoints, and courses you’ve created in Adobe Captivate or similar products on different devices.
  • Adaptive video streaming – Prime is able to convert video embedded in Captivate into formats optimized for HTML5 and mobile devices.
  • Microlearning – The ability to combine the different resources and modules that you upload means it’s easy to combine them into short courses, learning programs, or certifications.

Final Thoughts

Using the product there was a little bit of a learning curve, and some of the features seem a little bit non-intuitive,  e.g. the Left menu keeps changing when the user clicks on a link, when it might be easier to just have an expanded and collapsed menu. Also, the lack of a larger community using the product is a limitation in terms of seeing from other users what’s worked and what hasn’t. The product seems constantly evolving which is good and bad. Good in terms that new features are being added. However, it is bad when there is a lack of communication with its users on what those changes are. Though, the product is imperfect there is still a lot to like about this product. It’s quite flexible in terms of gamification and microlearning. I’d recommend this product for people that are in this space and have been using other LMS products in the past.